 Save to Pinterest
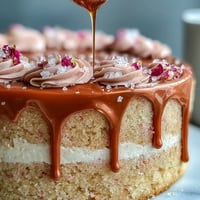
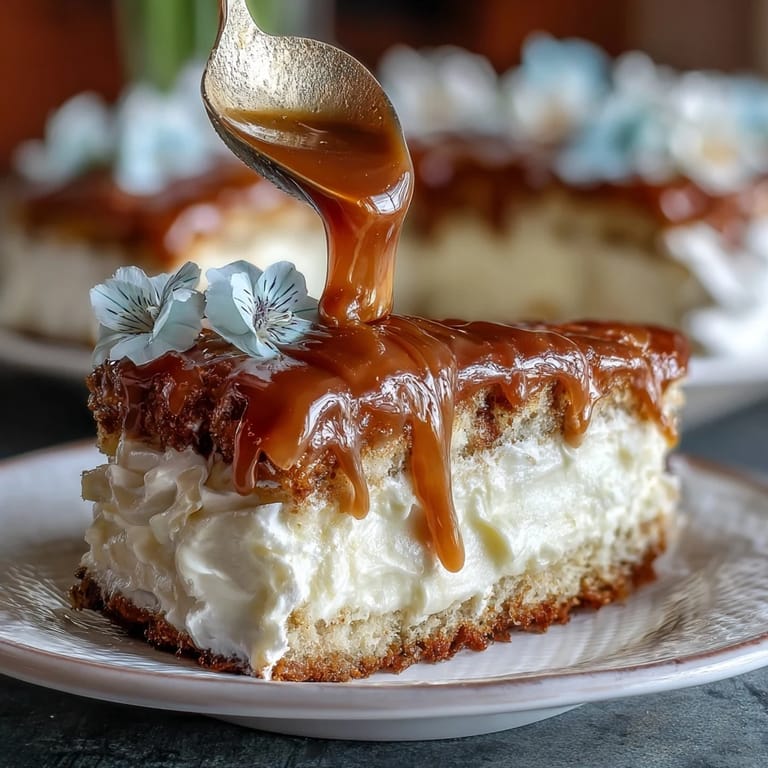
 The moment my friend mentioned her daughter's graduation, I knew exactly what I wanted to bake. I'd been watching gold leaf tutorials on my phone and had just discovered that edible flowers weren't some impossible luxury item—they were actually available at my regular grocery store. There's something about combining those shimmering gold accents with delicate pansies and violets that felt less like baking and more like crafting something worthy of celebrating years of hard work. This cake arrived at her house as much as an acknowledgment of achievement as it was a dessert.
I still remember my hands shaking a little as I positioned the first edible flower on the crumb coat. My friend stood in the kitchen watching, and when I stepped back to reveal the finished cake, she actually gasped. That sound—the pure joy of it—reminded me that sometimes the most meaningful recipes aren't the quickest or the easiest, but the ones that show someone you cared enough to learn something new just for them.
Ingredients
- All-purpose flour (2 1/2 cups): The foundation of your sponge—make sure it's at room temperature and sifted if you have time, as this prevents dense pockets in the finished cake.
- Baking powder (2 1/2 tsp): This gives the cake its tender crumb and helps it rise evenly, which matters when you're stacking three layers.
- Salt (1/2 tsp): A pinch that makes the vanilla flavor pop and balances the sweetness without you tasting salt directly.
- Unsalted butter (1 cup plus 1 1/2 cups for buttercream): Room temperature is non-negotiable here—cold butter won't cream properly and you'll end up with a dense cake.
- Granulated sugar (2 cups plus 1 1/4 cups for buttercream): Separate your sugar amounts before you start; this prevents mistakes and keeps your workflow smooth.
- Large eggs (4 for cake, 5 for buttercream): Room temperature eggs incorporate better and create a lighter, more emulsified batter.
- Vanilla extract (1 tbsp plus 2 tsp): Use pure vanilla if you can—imitation extract tastes flat against the delicate floral notes of the decoration.
- Whole milk (1 cup): It should be cold, which is the opposite of your other ingredients, but trust this contrast—it helps create the most tender crumb.
- Edible gold leaf sheets: Food-safe 24-karat gold is stunning, though cheaper varieties work too; store them flat in a cool, dry place or they'll crumble.
- Assorted edible flowers: Pansies, violets, and roses are your best bets—verify they're pesticide-free and specifically labeled for eating, never flowers from a florist.
- Food-safe paintbrush: A small, soft brush makes applying gold leaf feel intentional rather than accidental.
- Gold ribbon (optional): This adds one final elegant touch around the base, and it's surprisingly affordable.
Tired of Takeout? 🥡
Get 10 meals you can make faster than delivery arrives. Seriously.
One email. No spam. Unsubscribe anytime.
Instructions
- Prepare your pans and preheat:
- Set your oven to 350°F and take a moment to grease and line three 8-inch round pans with parchment paper. I like to butter the pan first, then press the parchment in—it stays put better that way. This step feels tedious until you're turning out perfect cake layers and feeling grateful you prepped properly.
- Combine dry ingredients:
- Whisk your flour, baking powder, and salt together in a medium bowl, breaking up any lumps as you go. Set it aside and you're already ahead of the game.
- Cream butter and sugar:
- Beat your room-temperature butter and sugar together until the mixture is pale, fluffy, and looks almost like wet sand—about 3 minutes. You'll notice the transformation happening; don't rush it because this step builds the structure of your entire cake.
- Incorporate eggs one at a time:
- Add each egg individually, beating well between additions so everything stays emulsified. If it looks a little curdled at first, keep going—it'll come together.
- Add vanilla and alternate wet and dry:
- Mix in your vanilla extract, then alternate adding flour mixture and milk, starting and ending with flour. This pattern prevents overworking the batter and keeps your cake tender.
- Divide and bake:
- Pour batter evenly among your three pans and smooth the tops with an offset spatula. Bake for 28 to 32 minutes until a toothpick comes out clean—your oven might run hot or cool, so start checking at 25 minutes.
- Cool properly:
- Let cakes rest in their pans for 10 minutes before turning them out onto wire racks to cool completely. This resting period is important because it prevents the crumb from breaking apart.
- Make Swiss meringue buttercream:
- Combine egg whites and sugar in a heatproof bowl over simmering water and whisk constantly until the mixture reaches 160°F and feels smooth—about 5 minutes. This pasteurizes the eggs and dissolves the sugar completely, so don't skip the thermometer.
- Beat until fluffy:
- Transfer your warm mixture to a stand mixer and beat on high until stiff peaks form and the bowl cools down, roughly 8 to 10 minutes. Your buttercream will go from glossy to fluffy and thick—this transformation is when you know you're close.
- Add butter gradually:
- Reduce the mixer speed to medium and add cubed butter a few pieces at a time, mixing between additions until everything is smooth. If it looks broken at first, keep mixing—it will come together into silky frosting.
- Finish with flavor:
- Mix in vanilla extract and a pinch of salt, which brightens the buttercream and prevents it from tasting overly sweet.
- Stack and crumb coat:
- Place one cooled cake layer on your serving plate, spread with buttercream, and repeat with remaining layers. Apply a thin crumb coat (which catches all those stray crumbs), chill for 20 minutes, then apply your final smooth layer of buttercream.
- Apply gold leaf carefully:
- Using your food-safe paintbrush, gently press edible gold leaf onto sections of the buttercream—it sticks to the frosting naturally. Work slowly and don't overthink placement; a few scattered sections look more elegant than covering the entire cake.
- Arrange flowers and finish:
- Position your edible flowers decoratively across the cake, adding a gold ribbon around the base if desired. Step back and admire your work before presenting it.
 Save to Pinterest
 What surprised me most was how genuinely special this cake felt, not because it was complicated, but because every element—the vanilla sponge, the silky frosting, those delicate gold and flower accents—came together intentionally. My friend brought it to the graduation party and people kept commenting on it throughout the evening, which felt like the highest compliment.
The Magic of Swiss Meringue Buttercream
The first time I made Swiss meringue buttercream, I was convinced something had gone wrong. The warm mixture beaten into peaks looked glossy and weird, and then halfway through adding the butter it looked completely broken and separated. But I kept going—trusting the process—and suddenly it transformed into the silkiest frosting I'd ever felt. That moment taught me that this buttercream rewards patience and precision in a way American buttercream never could. It's more stable in warm rooms, less aggressively sweet, and it pipes like dreams.
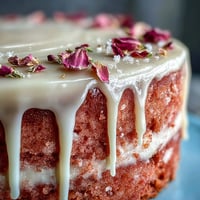
Why Edible Flowers Make All the Difference
There's psychology in decoration that matters more than we admit. A plain frosted cake is fine, but add a few strategically placed pansies and suddenly you're serving something that feels celebratory and intentional. I learned that edible flowers should be sourced carefully—avoid anything from regular florists because they're typically treated with chemicals—and instead seek them out at specialty grocery stores or farmers markets where you can ask questions. The visual lift they provide isn't just about beauty; it's about signaling that this cake is special and was made with forethought.
Decorating Tips and Techniques
The most important thing I discovered about decorating with gold leaf is that you can't panic or overthink it. Gold leaf is forgiving because if you apply it slightly imperfectly, it still catches the light beautifully. The paintbrush method works better than bare fingers because the soft bristles help position the delicate sheets without tearing them. Work in a draft-free kitchen because even a hint of air movement sends gold leaf flying.
- Chill the frosting slightly before applying gold leaf so the surface is firm enough to hold it without smudging.
- Add edible flowers at the very end of your decorating process, ideally within an hour of serving, so they stay fresh and vibrant.
- Step back frequently and view the cake from different angles to ensure your decorations feel balanced rather than clustered in one spot.
 Save to Pinterest
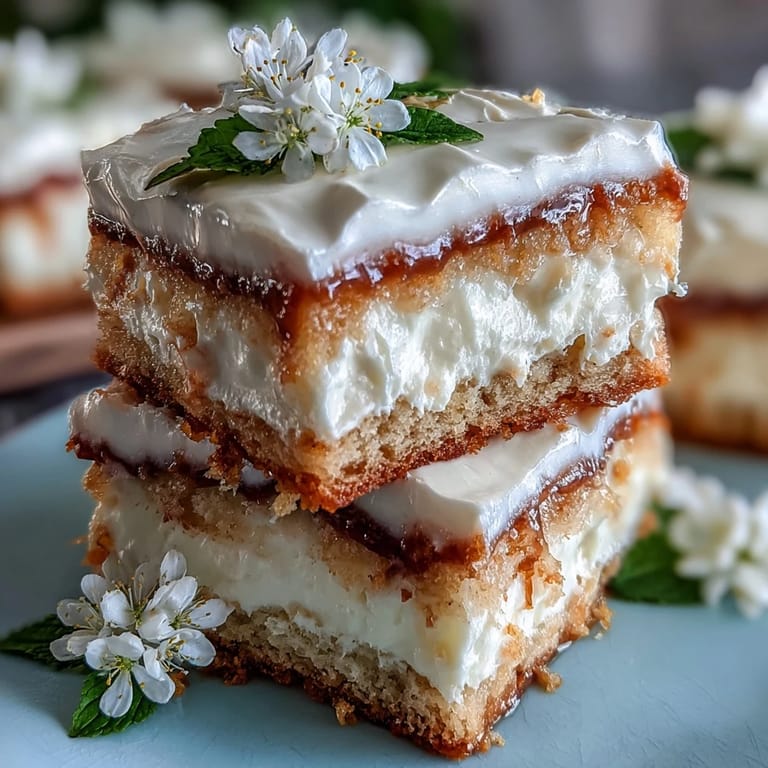
 This cake transforms a graduation celebration into something genuinely memorable, the kind of dessert people photograph and remember years later. Bake it with the confidence that you're honoring someone's achievement with something as beautiful as it is delicious.
Recipe FAQs
- → What is the best way to apply the gold leaf?
Use a food-safe paintbrush to gently lift and place the delicate gold leaf sections onto the cake, handling them with care to avoid tearing.
- → Can I prepare the buttercream in advance?
Yes, the Swiss meringue buttercream can be made ahead and stored chilled. Bring it to room temperature and re-whip before spreading.
- → How should the edible flowers be selected?
Choose only flowers labeled as edible and pesticide-free, such as pansies, violets, or roses, to ensure safety and freshness.
- → Is there an alternative flavor variation?
For a twist, substitute half a cup of flour with cocoa powder to add a chocolate note while maintaining texture.
- → What serving size does this cake yield?
This cake comfortably serves 12 portions, ideal for medium-sized celebrations.
- → How long does the baking and preparation take?
The total active time, including baking and buttercream preparation, is approximately 1 hour and 20 minutes, excluding cooling and decorating.